Tuesday, November 24, 2009

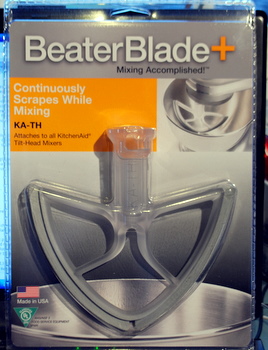
Beater Blades- Solution found!


One of the biggest problems with a stand mixer is that the mixer blade does not reach all the way down to the bottom of the bowl, so you have to get out a spatula and mix your batter by hand. It’s only an annoyance because the beauty of a stand mixer is that it should be hands-free. Over the past several months, a number of companies have come out with  mixer attachments that offer a solution to this problem, and Beater Blade is one of them.
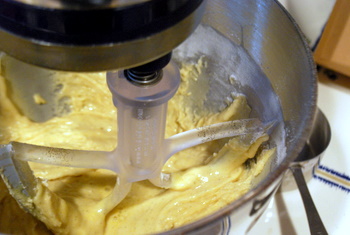
Beater Blade looks like the regular paddle attachment for a mixer, but it has a flexible “wing” that reaches out from the paddle to the bottom of the bowl, so it scrapes the bowl with a soft blade that mixes efficiently without damaging your mixer. The company makes Beater Blades to fit all different styles and brands of electric mixers, including KitchenAid, Viking and DeLonghi, and all the Blades are dishwasher safe.

I used my Beater Blade to whip up some egg whites and to make a batch of cupcakes. It performed very well at both tasks, scraping in every last bit of flour for my cupcake batter - without over-mixing and making the cupcakes tough - and whipping the egg whites up so that they were fluffy and left no unwhipped pool of egg white around the dimple at the bottom of my KitchenAid bowl.  I was a bit skeptical before I tried it, but the Blade delivered all that it promised and is a nice accessory to have in the kitchen if you want to make better use of your stand mixer.

Sunday, November 22, 2009

Paula Deen's Praline French Toast


  The holidays are fast approaching and So you will have a full house. Here is a great make-ahead breakfast that everyone will love.

Ingredients

  • 1 loaf French bread (13 to 16 ounces)
  • Butter, for pan
  • 8 large eggs
  • 2 cups half-and-half
  • 1 cup milk
  • 2 tablespoons sugar
  • 1 tablespoon vanilla extract
  • 1/2 teaspoon ground cinnamon
  • 1/2 teaspoon ground nutmeg
  • Dash salt
  • Praline Topping, recipe follows

Directions

Slice French bread into 20 slices, 1-inch thick each. (Use any extra bread for garlic toast or bread crumbs). Arrange slices in a generously buttered 9 by 13-inch flat baking dish in 2 rows, overlapping the slices.
In a large bowl, combine the eggs, half-and-half, milk, sugar, vanilla, cinnamon, nutmeg and salt and beat with a rotary beater or whisk until blended but not too bubbly. Pour mixture over the bread slices, making sure all are covered evenly with the milk-egg mixture. Spoon some of the mixture in between the slices. Cover with foil and refrigerate overnight.
The next day, preheat oven to 350 degrees F. Spread Praline Topping evenly over the bread and bake for and hour (dont be surprised if it can bake up to 90 minutes, depending on your oven), until puffed and lightly golden. If the edges cook too fast, try covering with tinfoil for the last 30 minutes.

Praline Topping:

1/2 pound (2 sticks) butter
1 cup packed light brown sugar
1 cup chopped pecans
2 tablespoons light corn syrup
1/2 teaspoon ground cinnamon
1/2 teaspoon ground nutmeg
Combine all ingredients in a medium bowl and blend well. Spread over bread as directed above.

Friday, November 20, 2009

Maple Pumpkin Custard

  My friends at Big City Catering posted this recipe on their blog recently. I am a HUGE fan of their food, so I cant wait to try this recipe for Thanksgiving.


Maple Pumpkin Custard

Ingredients:

  • 1/3 cup sugar
  • 6 egg yolks
  • 1 teaspoon vanilla extract
  • 1/4 teaspoon cinnamon
  • 1/8 teaspoon ground nutmeg
  • a pinch of ground cloves
  • 1/8 teaspoon salt
  • 1 cup light cream
  • 1 cup heavy cream
  • 2/3 cup solidly packed pumpkin mash, or canned pumpkin
  • 1/2 cup pure maple syrup
Directions:

  1. Heat oven to 300 degrees. In a large mixing bowl, whisk together the sugar, yolks, vanilla extract, spices, and salt. Set the mixture aside.
  2. In a medium-size saucepan, whisk together the light and heavy creams, pumpkin, and maple syrup, then bring the mixture to a simmer over medium- low heat, stirring occasionally. Do not let the mixture boil.
  3. Remove the pan from the heat once the pumpkin mixture is hot, about 5 minutes. Add it by the ladleful to the yolk mixture, stirring continuously. Don't pour it all in at once or it will cook the yolks too quickly.
  4. Once the mixtures are blended, divide the custard evenly among 6 standard custard cups. Pour 3/4 inch of hot water into a large, shallow casserole dish, then arrange the cups, evenly spaced, in the dish. Bake the custards, uncovered, on the center over rack until their centers are jiggly but no longer soupy, about 45-50 minutes. Carefully transfer the cups to a wire rack to cool.
  5. When the custards reach room temperature, cover the dishes individually with plastic wrap and refrigerate them for at least 6 hours. Makes 6 servings

Pumpkin Shortage!?!?!?

How in the world did a pumpkin shortage come to be? The good folks at Libby’s, the largest producer of canned pumpkin in the nation, have released a statement describing how sustained heavy rains for three plus months saturated fields making it impassable for tractors and other harvesting equipment to maneuver at all. Additionally, the longer the pumpkins sit in their soaked seats the lower the quality bar of the gourd falls. If the pumpkins are wet long enough eventually they will rot.  Because of these compounded reasons, Libby has stopped harvesting and canning pumpkins causing inventories to dwindle rapidly with no reserves coming to replenish local shelves.

Since my absentee pumpkin incident, both Publix and Sweetbay Supermarkets have released statements concurring they will have enough canned pumpkin supply to get through the holidays. However, that also means fierce competition to get your hands on what is left. You can fight it out and dodge some sharp elbows in aisle three if you want, but I think I’ll take this opportunity to try something new for the Thanksgiving holiday........... well, maybe after I try these new Pumpkin Maple Custards I just found, YUM!!!

Simply Better Lasagna

 As the holidays approach I realize that make ahead food is critical for my survival.  One of my favorite stand-by dishes is lasagna.. easy to make and easy to bake! But I always find it to be a mess in the middle and not fully cooked..... so imagine how excited I was when I discovered THIS lasagna pan (they were the first to make a brownie pan will EVERY bit having edges!)  Check it out HERE!


Wednesday, November 18, 2009

Mini Dreidel Cakes

With the holidays approaching, I know many of you are looking for something to do with the kids. I know, I know..... We havent even made it through Thanksgiving!!! I like to plan ahead and have a list of ideas, so I am not under the gun.  Serve these yummy cake bites to "top" off your Hanukkah dinner.  These adorable mini driedels are fun for kids to help make......... so add them to the holiday fun!


What You Need (shown above with Marshmallows as an option instead of pound cake)

1 frozen pound cake, cut into 6 thick slices
White Chocolate candy melts
White Chocolate candy kisses
White striped straws, cut into 2 in. pieces

OR

1 Frozen pound cake, cut into 6 thick slices
Milk chocolate candy melts
Milk chocolate Hershey Kisses
Pretzel sticks

What You Do
For ease of cutting, make sure the pound cake is frozen. Using a serrated knife, trim the "crust" (outside brown layer) from the pound cake slices.

Cut each slice of cake into 4 rectangles - slice vertically in half and then horizontally in half. Holding a rectangle - long sides pointing up and down - stick one piece of a straw into the top of the cake, creating a handle.

Melt candy melts in the microwave according to directions. Reserve 1/2 cup of chocolate.

For the White chocolate version
Holding onto the straw handle , dip each piece of cake into the white chocolate, turning to cover. Lie on plate and immediately stick a candy kiss onto the open end of the cake. After dipping in the chocolate, you can immediately dip into sprinkles or colored sugar. Once all of the cake pieces have been covered with chocolate and sugar, chill in refrigerator for 15 minutes.

Tint the reserved 1/2 cup of chocolate light blue. Fill a small plastic Baggie with the blue chocolate, creating a decorating bag. Barely snip one corner of the Baggie. Use this to draw the outlined boxes and letters on the Dreidels.

For the “Real” chocolate version
Holding onto the Pretzel handle, dip the end of cake into the melted chocolate. Lie on plate and immediately stick a candy kiss onto the open end of the cake where you dipped chocolate. Let it cool, ensuring the Hershey kiss is on securely. Once all of the cake pieces have been covered with chocolate, chill in refrigerator for 15 minutes.
Melt some white chocolate candy melts. Fill a small plastic Baggie with the chocolate, creating a decorating bag. Barely snip one corner of the Baggie. Use this to draw the outlined boxes and letters on the Dreidels.
Store in a sealed container in the refrigerator. Bring to room temperature 30 minutes before serving.

Can be frozen after decorated.

Image courtesy of Nicole Heady

Tuesday, November 10, 2009

French-Fry Pie

I have a mad passion for French Fries..... So of course this simple family style recipe just caught my eye.  To make this "healthier" (I know, stop snickering) try using a lower fat beef or even ground turkey.
Serves 4              Hands-On Time: 15m                 Total Time: 35m

Ingredients


  • 4 cups frozen shoe-string French fries
  • 1 1/2 pounds ground beef
  • 1 14-ounce jar marinara sauce

Directions

  1. Heat oven to 425° F.
  2. Spread the fries on a baking sheet. Bake until golden, about 25 minutes.
  3. Meanwhile, cook the ground beef in a medium saucepan over medium-high heat, stirring occasionally, until no trace of pink remains, 8 to 10 minutes. Spoon off any excess fat. Add the marinara sauce and cook until warmed through.
  4. Transfer to an 8-by-11-inch or 8-inch-square baking dish. Top with the fries. If desired, return to oven for 5 minutes to allow the flavors to meld.

Monday, November 9, 2009

Weddings are like cooking – having wonderful ingredients doesn’t mean you’ll have a great meal

For some reason I think its common knowledge… I mean haven’t we all heard from someone, stories at some point of things that didn’t go right at a wedding.  They happen at every single wedding no matter who is in charge. I know brides are working with a budget- especially these days but everyone seems to think they can save on costs by “doing it themselves”.  I have an idea… Lets invest in a great photographer to capture the moments and the details, lets hire a floral designer to make everything look pretty, lets spend money on linens, favors, and a dessert bar but when it comes to getting a professional wedding coordinator to pull together all the details I just mentioned so all of them work in harmony.. lets skimp on that? Lets invest all of that but then on the wedding day as a bride you can worry or pawn it off on an aunt, mom, or wedding party member (which lets be quite frank-they will be way more frazzled than you). Just to be clear.. I am not saying  I am against DIY. I’m not! I like that style BUT I am a huge advocate of bringing someone on board who knows what they are doing to put things at ease no matter the scale of the wedding.
After being in the wedding industry and planning or attending as many weddings as I have, I’ve seen it first hand time and time again.  However, the experience I had several weeks ago at a friend’s wedding was so unbelievable.
I now feel it is my duty to share. She got married at private estate and decided to go with the venue coordinator/catering liaison because they ensured her they would take care of everything she needed on her wedding day. Ummm…, NO!  I’m mean I was so upset with the way this catering /venue representative  treated the bride and the extreme lack of poise, class, and knowledge that I am going to list for you some specifics of the disaster that ensued:
You may want to hire a wedding planner or else:
1. Your “day of  stand in coordinator ” could forget to place an order which then leaves it all in the hands of the bride on the day of her rehearsal so that she and her  parents are 30 minutes late.
2. Your “day of stand in coordinator” could decide to make a change on one of your vendor contracts leaving you to pay the difference for their error and then when the vendor calls you the morning of your wedding to tell you and you verify it with your “coordinator” they may say, “you are ruining their day?” Really?? Who says that to a bride?
3. Your “day of  stand in coordinator” may forget to send the shuttle to one of the hotels and leave 30 guests behind minutes before your ceremony is about to start. Then when confronted with this situation may say “ I don’t give a f***k. Tell them all to take cabs! I am not starting this ceremony late!” OMG!!!!
4. Your “day of stand in coordinator” may not really know how to run a real ceremony and forget to cue wedding party or heaven forbid the musicians to know when the bride should walk down the aisle! What a disaster that can be as the guests all wait while nothing happens but the same song plays over and over again. Oh also they may forget to remove the ribbon that blocks off the center aisle so guests don’t go through it, but when its time for the ceremony procession to start its wise of them to remove it so that a guest from the second row doesn’t have to run in her heels sinking in the grass all the way to the back of the aisle and remove the ribbon seconds before the wedding party walk through while photo and video are rolling.
5. Your “ day of stand in coordinator” who in this case is also the venue coordinator and caterer- might run out of certain types of food and wine because of poor planning AND not even offer a certain dish that is listed on the menu and just tells guests “ Oh, we don’t have that tonight- I’ll just give you a plate of mashed potatoes and veggies instead”.
Can you believe that these elements really did happen all at one wedding? And these were just the highlights? Do you have any stories of your own?
One piece of advice: You get what you pay for! SO when you don’t pay for a friend who is helping you out as your “day of stand in coordinator” OR you find one that is only a couple hundred dollars…. guess what- it may not be that good of an outcome.

Hollar to all planners who know their stuff. You are fabulous and deserve  big props but most importantly you deserve to be paid and respected. You help facilitate one of the most memorable days in a couples’ life.

 The Inspired By This blog is the professional wedding industry blog of Los Angeles Wedding Publicist Leila Khalil, owner of Be Inspired PR, a subsidiary of Be Inspired LLC.

Related Posts with Thumbnails